Flutter Terminal Commands Guide: Run, Debug, Build, and Deploy Apps from Android Studio for Android, iOS, Web, and Desktop

Flutter Terminal Commands Guide

1. Go to Your Flutter Project

cd path/to/your/flutter_project

Changes the terminal’s current folder to your Flutter project directory.


2. Check Flutter Installation

flutter doctor

Verifies that Flutter, Dart, Android Studio, Xcode, and other required tools are installed correctly.


3. Get Packages

flutter pub get

Downloads and installs all dependencies listed in your pubspec.yaml file.


4. See Available Devices

flutter devices

Lists all connected devices and emulators that can run your Flutter app.


5. Run the App

flutter run

Builds and launches the application on the default available device.

Run on a Specific Device

flutter run -d <device_id>

Runs the application on a selected device instead of the default one.

Run on macOS

flutter run -d macos

Launches the Flutter application as a native macOS desktop app.

Run in Google Chrome

flutter run -d chrome

Runs the application as a web app inside Google Chrome.

Run in Microsoft Edge (Windows)

flutter run -d edge

Runs the Flutter web application in Microsoft Edge.

Run in Safari (macOS)

Flutter does not directly support Safari.

flutter run -d web-server

Starts a local web server and provides a URL that can be opened in Safari.

Then open the displayed URL, such as:

http://localhost:8080

Useful Commands

Hot Reload

r

Applies code changes instantly while preserving the application’s current state.

Hot Restart

R

Restarts the Flutter application and reloads all code from scratch.

Quit

q

Stops the running Flutter application and exits the debug session.


Clean Project

flutter clean
flutter pub get

Removes old build files and downloads fresh dependencies to fix many project issues.


Build macOS App

flutter build macos

Creates a release-ready macOS desktop application.


Build Android APK

flutter build apk

Generates an Android APK file for direct installation or testing.


Build Android App Bundle (Google Play)

flutter build appbundle

Creates an AAB file optimized for publishing on the Google Play Store.


Build iOS App

flutter build ios

Generates an iOS build that can be opened in Xcode for App Store submission.


Build Web App (PWA / Web Application)

flutter build web

Creates optimized HTML, JavaScript, and asset files for website deployment.

The generated files are stored in:

build/web

Serve the Built Web App Locally

python3 -m http.server 8000 --directory build/web

Starts a lightweight local web server to preview the production web build.

Then open:

http://localhost:8000

in Chrome, Edge, Safari, or another browser.


Check Flutter Version

flutter --version

Displays the installed Flutter and Dart versions.


Upgrade Flutter

flutter upgrade

Updates Flutter to the latest stable release.


View Connected Emulators

flutter emulators

Shows all available Android and iOS emulators installed on your system.


Analyze Project

flutter analyze

Checks your code for errors, warnings, and best-practice issues.


Run Tests

flutter test

Executes all unit and widget tests in the project.


Upgrade Dependencies

flutter pub upgrade

Updates project dependencies to newer compatible versions.


Benefits of Deploying Flutter Applications

One of Flutter’s greatest strengths is the ability to deploy the same codebase to Web, iOS, Android, and Desktop platforms.

Web (PWA / Web Application)

  • Users can access the application instantly through a browser.
  • No installation is required.
  • Easy to share through a URL.
  • Ideal for business websites, dashboards, SaaS platforms, and customer portals.
  • Lower deployment and maintenance costs.

iOS

  • Access to Apple’s App Store ecosystem.
  • Reaches iPhone and iPad users worldwide.
  • Strong user engagement and premium audience.
  • Supports Apple services such as Apple Pay and Sign in with Apple.
  • Delivers a native, high-performance user experience.

Android

  • Access to the world’s largest mobile platform.
  • Reach billions of users through Google Play.
  • Supports a wide range of devices and price points.
  • Easy distribution and testing.
  • Strong integration with Google services and APIs.

Why Flutter?

Instead of maintaining separate projects for Web, iOS, and Android, Flutter allows developers to build all platforms from a single codebase. This reduces development costs, speeds up releases, simplifies maintenance, and provides a consistent user experience across devices.

About Kia Malek Mohammadi

App & AI Consultant | Mobile Apps, Automation & Digital Solutions

Hello, I’m Kia Malek Mohammadi,

an App & AI Consultant focused on helping startups and businesses transform ideas into practical digital products.

My work combines mobile app development, artificial intelligence, business automation, and modern software architecture to create solutions that are scalable, reliable, and designed for long-term growth. Whether it is a native iOS application built with SwiftUI, a cross-platform Flutter app, AI-powered automation, or backend integration, I focus on delivering technology that solves real business problems.

My background in engineering has shaped the way I approach software development. I believe successful products are built through a combination of technical precision, structured problem-solving, and a clear understanding of business needs. Rather than simply writing code, I aim to create systems that improve efficiency, automate repetitive tasks, and help organizations operate more effectively.

Over the years, I have worked across multiple areas of technology, including mobile applications, web development, AI integration, backend services, databases, and digital transformation projects. This broad perspective allows me to connect technical implementation with business objectives and user experience.

Technology is more than a profession for me. It is a field of continuous learning, creativity, and innovation. I enjoy transforming complex challenges into simple, practical solutions that people can use every day.

At KiaApp, my goal is straightforward: build useful software, create measurable value, and help businesses grow through technology.

Core Areas of Expertise

  • Mobile App Development (SwiftUI & Flutter)
  • Artificial Intelligence Integration
  • Business Automation
  • Backend & Cloud Solutions
  • Database Design & Management
  • Startup Technology Consulting
  • Web Development & Digital Solutions

If you have an idea, a startup, or a business process that could benefit from technology, I would be happy to discuss how we can turn it into a practical solution.

Dev Beats Homesickness

Rebuilding Life Through Technology After an Accident

Rebuilding Life Step by Step Through Technology

After the accident, life was no longer the same. Simple daily routines, mental focus, energy, and even the feeling of living a normal life had changed. But slowly, technology, programming, and the digital world became part of my path back.

What started as simply working with computers and building apps and websites gradually turned into focus, mental peace, purpose, and rebuilding life itself.

A World That Allowed Me to Move Again

I spend many hours in front of a screen — programming, designing, translating, and creating digital ideas. But for me, this is not just “work.”

The digital world became a place where I could once again feel useful, creative, and connected to life.

When some parts of real life become difficult, creating things in the digital world can bring back a sense of movement, hope, and progress.

Why Rebuilding Life Through Technology Helped Me

Deep Focus and Escaping Mental Chaos

Whenever I work on building an app or designing a website, my mind enters a deep state of concentration. Hours pass without me even noticing.

Problem-solving, writing code, and creating something new help direct the mind away from stress, exhaustion, and emotional pressure.

The Feeling of Progress and Achievement

After the accident, even some simple daily tasks became difficult. But completing a project, launching an app, or solving a programming problem brought back my sense of progress.

Every small project reminded me that it is still possible to build, grow, and move forward.

Staying Connected to the World

Technology helped reduce the feeling of being disconnected from the world. Through web development, translation, and digital projects, I can still stay connected with people, cultures, and ideas from different places.

Sometimes a screen can become a window to the outside world.

Freedom and Flexibility Through Technology

One of the most beautiful aspects of the digital world is the freedom to work from almost anywhere. This flexibility helps people adapt more easily to physical and mental challenges while finding their own rhythm in life.

The Reality of Rebuilding Life Through Technology

Positive Sides

  • A renewed sense of purpose and meaning
  • Mental growth and creativity
  • Professional independence
  • Continuous learning
  • Creating useful and meaningful things

Challenges

  • Eye and physical fatigue
  • Long hours of sitting
  • Mental pressure
  • Occasional feelings of isolation

That is why I try to create balance between work and health through walking, rest, light exercise, and staying connected with family and friends.

Final Thoughts on Rebuilding Life Through Technology

“Code is not just technology; sometimes it becomes a way to rebuild yourself.”

For me, the digital world is not only a career or a hobby. Rebuilding life through technology helped me regain focus, rediscover meaning, and adapt to a new chapter of life.

Sometimes a screen is not an escape from life;
sometimes it is the beginning of rebuilding it.

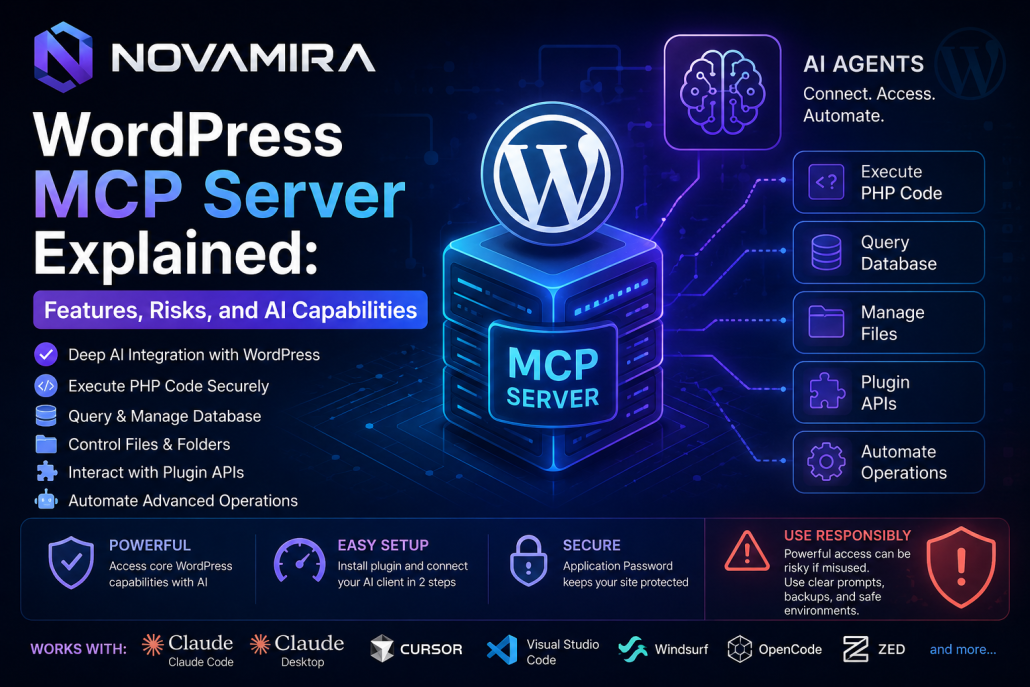
Novamira WordPress MCP Server Explained: Features, Risks, and AI Capabilities

Novamira is a free and open-source WordPress MCP server developed

by the Dynamic.ooo team to create a deep connection between

artificial intelligence and WordPress websites. It allows AI agents to

directly access the WordPress environment, execute PHP code, manage

databases, control files, interact with plugin APIs, and automate

advanced website operations through modern AI clients.

Unlike many WordPress MCP servers that provide only limited

predefined tools, Novamira offers a far more flexible and powerful

architecture. Instead of restricting AI to a few fixed functions, it gives

AI access to the core capabilities of WordPress itself. Because

Novamira can securely execute PHP code inside WordPress, AI agents

can perform almost anything that WordPress can do. Developers can

also create custom AI abilities, intelligent workflows, and advanced

automation systems on top of the platform. This creates a highly

flexible environment for backend development, website management,

content automation, and AI-powered operations.

One of Novamira’s biggest advantages is its fast and simple

installation process. Setup only requires two steps. First, the Novamira

plugin is installed on the WordPress website. Then, the preferred AI

client is connected using the MCP configuration automatically

generated inside the WordPress dashboard. Novamira supports Claude

Code, Claude Desktop, Cursor, Visual Studio Code, Windsurf,

OpenCode, Zed, and many other MCP-compatible AI clients.

After installation, WordPress generates a secure Application Password

that allows authenticated communication between the AI client and the

WordPress environment. This password must remain private because it

provides direct access to website operations and AI automation

features.

Inside the WordPress dashboard, Novamira automatically generates the

commands required for MCP integration. Connecting AI clients such

as Claude Desktop or Cursor simply involves copying the generated

configuration into the MCP Server settings of the selected client. Once

the configuration is saved and the client is restarted, WordPress

becomes available as an active MCP server directly inside the AI

environment.

After enabling the “AI Abilities” option, Novamira unlocks advanced

AI-powered capabilities for the website. AI agents can automate

workflows, manage backend operations, interact with plugins, and

dynamically extend website functionality using PHP execution and

custom automation logic.

However, the same deep access that makes Novamira powerful can

also make it risky if used carelessly. Because AI agents can execute

PHP code and interact directly with WordPress internals, they may

unintentionally modify files, change plugin settings, edit PHP

functions, or perform actions that the website owner does not want.

Poorly written prompts or unrestricted permissions may cause

unwanted modifications inside the WordPress environment.

For this reason, users should always provide clear and controlled

instructions to AI agents. It is highly recommended to use backups,

staging environments, restricted permissions, and careful supervision

before enabling advanced AI automation on live production websites.

Novamira represents a major step forward in AI-

powered WordPress development by combining open-

source flexibility, MCP compatibility, deep WordPress

integration, and intelligent automation into a single

platform.

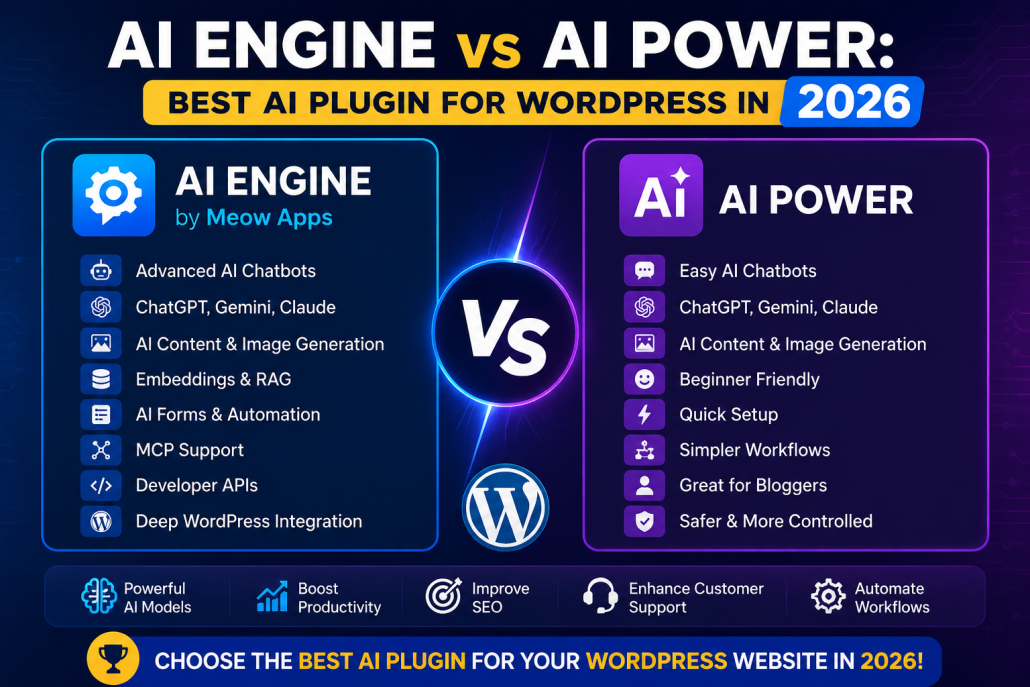
AI Engine vs AI Power: Best AI Plugin for WordPress in 2026

Meow Apps is a well-known WordPress development company recognized for creating advanced artificial intelligence tools for modern websites. The company is best known for developing AI Engine, one of the most powerful AI plugins for WordPress. Meow Apps focuses on integrating modern AI technologies such as ChatGPT, Google Gemini, Claude AI, image generation, embeddings, automation, and intelligent workflows directly into WordPress websites. Its tools are designed for developers, businesses, bloggers, and website owners who want to bring artificial intelligence into content creation, customer support, SEO optimization, and website automation.

AI Engine, developed by Meow Apps, is an advanced AI plugin for WordPress that transforms websites into intelligent AI-powered platforms. The plugin supports OpenAI models like ChatGPT and GPT APIs, Google Gemini, Anthropic Claude, and several other modern AI systems. AI Engine allows users to create AI chatbots, generate SEO-friendly articles, produce AI-generated images, build custom AI forms, and automate content workflows directly inside the WordPress dashboard. One of its strongest features is support for embeddings and Retrieval-Augmented Generation (RAG), enabling websites to build intelligent knowledge bases and context-aware AI assistants. AI Engine also provides extensive developer APIs, deep WordPress integration, and support for MCP (Model Context Protocol), making it highly attractive for developers and advanced AI projects.

AI Power is another popular WordPress AI plugin that competes with AI Engine in the growing AI website ecosystem. AI Power focuses more on simplicity, beginner-friendly setup, and fast AI content creation for bloggers, marketers, and general website owners. Similar to AI Engine, it supports OpenAI, Google Gemini, and Claude AI models while offering chatbot functionality, AI content generation, and AI image creation tools. However, AI Power provides a more simplified experience with fewer advanced developer tools and less complex AI workflow customization.

When comparing AI Engine and AI Power, both plugins provide strong AI chatbot capabilities, AI-assisted content generation, AI image creation, and support for modern AI models such as ChatGPT, Gemini, and Claude. However, AI Engine stands out because of its deeper WordPress integration, advanced automation features, extensive APIs, and stronger embeddings and RAG support. This allows developers to create more intelligent and scalable AI systems directly inside WordPress websites. AI Power, on the other hand, prioritizes ease of use and simplified AI functionality, making it more suitable for users who want quick AI integration without advanced configuration.

AI Engine is generally considered the better solution for developers, AI enthusiasts, automation projects, and websites requiring advanced AI functionality. Because it provides deeper system access and more powerful automation tools, careful configuration is recommended on live production websites. AI Power is often considered safer and easier for beginners because it offers more controlled functionality with fewer advanced system-level features. Ultimately, AI Engine is ideal for advanced AI integration and custom WordPress development, while AI Power is best suited for bloggers, marketers, and users seeking simple AI-powered website tools.

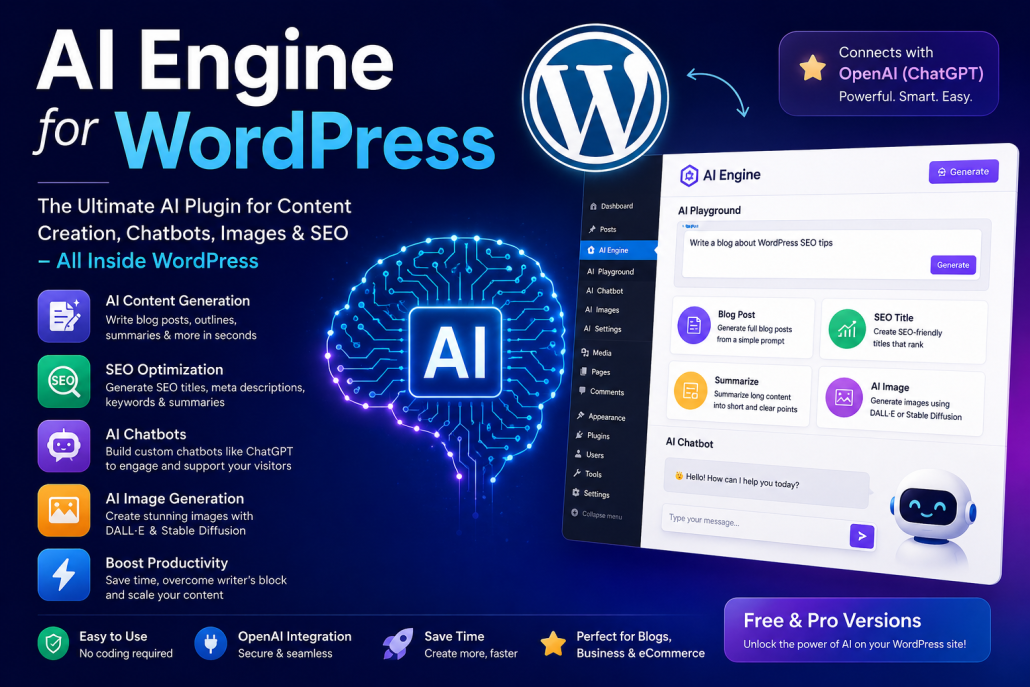
AI Engine for WordPress

AI Engine WordPress plugin dashboard interface showing AI content generation, AI chatbot, SEO optimization, OpenAI integration, and AI image generation features for WordPress websites.

What if your WordPress website could automatically

write blog posts, generate AI images, create SEO titles,

summarize articles, and even chat with your visitors

like ChatGPT? Thanks to modern artificial intelligence

tools, this is now possible directly inside WordPress.

One of the most powerful plugins currently available

for this purpose is AI Engine, a feature-rich WordPress

AI plugin developed by Jordi Meow. This plugin

connects your website to OpenAI, the same technology

behind ChatGPT, and allows website owners,

bloggers, developers, and businesses to integrate

advanced AI tools into their WordPress dashboard

without complicated coding.

AI Engine is designed to make content creation and website

management faster, easier, and more efficient. After installing the

plugin from the WordPress plugin directory, you simply connect it to

your OpenAI API key. Once connected, your website gains access to a

wide range of AI-powered capabilities. For example, if you are writing

a technology blog, you can type a short prompt such as “Write an

article about WordPress SEO tips for beginners,” and AI Engine will

generate a complete article draft within seconds. This is extremely

useful for bloggers who regularly publish content and need help

overcoming writer’s block or generating new ideas quickly.

Another powerful feature of AI Engine is its AI Playground. This

section allows users to experiment with prompts, create summaries,

generate outlines, brainstorm article ideas, or rewrite content in

different styles. For instance, a digital marketer could ask the AI to

create five catchy SEO-friendly titles for a blog post, while an app

developer could generate a quick tutorial introduction for SwiftUI or

Flutter projects. Instead of spending hours brainstorming, AI Engine

helps accelerate the creative process directly inside WordPress.

One of the most impressive features is the integrated AI chatbot

system. AI Engine allows you to create a custom chatbot similar to

ChatGPT and place it anywhere on your website using a shortcode. For

example, an e-commerce website could use the chatbot to answer

product questions automatically, while a personal blog could use it to

engage visitors and recommend articles. The chatbot can be

customized to match your website’s personality, control response

length, and even limit topics. This makes it useful for customer

support, lead generation, and user engagement.

AI Engine also supports AI image generation using technologies such

as DALL·E and Stable Diffusion. Users can create images directly

inside WordPress by simply typing prompts like “modern minimalist

workspace with AI technology” or “futuristic mobile app interface.”

These generated visuals can be used as blog thumbnails, placeholders,

hero sections, or idea visualizations. Although it does not fully replace

professional design software like Photoshop, it dramatically speeds up

content production for bloggers and creators.

The plugin also includes tools for SEO optimization. Users can

generate SEO-friendly titles, meta descriptions, keywords, and

summaries directly from the editor. For example, if you publish articles

about MongoDB, AI Engine can automatically create optimized

headlines such as “MongoDB Indexing Explained for Beginners” or

“How MongoDB Improves Database Performance.” This helps

improve search engine visibility while saving time.

The Pro version of AI Engine unlocks even more advanced features,

including memory-based chatbots, prompt templates, AI assistants

trained on your own content, and deeper customization options. For

businesses and professional websites, these advanced capabilities can

significantly improve productivity and automation.

Overall, AI Engine is one of the most complete and

lightweight AI plugins available for WordPress today.

It combines AI content writing, chatbot systems, image

generation, and SEO tools into a single platform.

Whether you run a blog, a business website, an e-

commerce store, or a technology platform, AI Engine

provides a practical and modern way to integrate

artificial intelligence directly into your WordPress workflow.

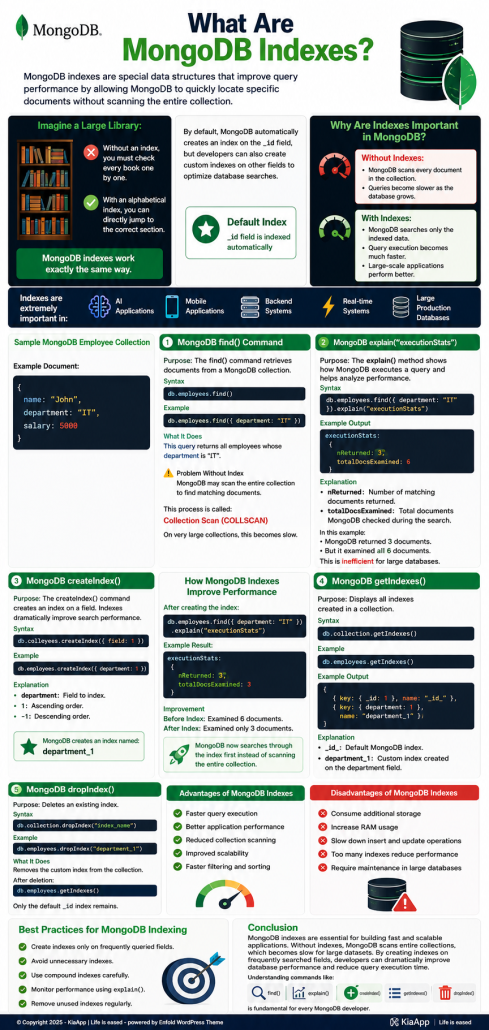
MongoDB Indexing Explained: Create, Use, and Delete Indexes in MongoDB

MongoDB indexing infographic explaining MongoDB indexes, query optimization, createIndex(), find(), explain(), getIndexes(), dropIndex(), database performance improvement, and best practices for scalable backend applications.

What Are MongoDB Indexes?

MongoDB indexes are special data structures that

improve query performance by allowing MongoDB to

quickly locate specific documents without scanning the

entire collection.

Imagine a large library:

* Without an index, you must check every book one by

one.

* With an alphabetical index, you can directly jump to

the correct section.

MongoDB indexes work exactly the same way.

By default, MongoDB automatically creates an index

on the _id field, but developers can also create custom

indexes on other fields to optimize database searches.

⸻⸻⸻

Why Are Indexes Important in MongoDB?

Without indexes:

* MongoDB scans every document in the collection.

* Queries become slower as the database grows.

With indexes:

* MongoDB searches only the indexed data.

* Query execution becomes much faster.

* Large-scale applications perform better.

Indexes are extremely important in:

* AI applications

* Mobile applications

* Backend systems

* Real-time systems

* Large production databases

⸻⸻⸻

Sample MongoDB Employee Collection

Example document:

{

   name: “John”,

   department: “IT”,

   salary: 5000

}

⸻⸻⸻

1. MongoDB find() Command

Purpose

The find() command retrieves documents from a

MongoDB collection.

Syntax

db.employees.find()

Example

db.employees.find({ department: “IT” })

What It Does

This query returns all employees whose department is “IT”.

Problem Without Index

MongoDB may scan the entire collection to find

matching documents.

This process is called:

* Collection Scan (COLLSCAN)

On very large collections, this becomes slow.

⸻⸻⸻

2. MongoDB explain(“executionStats”)

Purpose

The explain() method shows how MongoDB executes

a query and helps analyze performance.

Syntax

db.employees.find({ department: “IT”

}).explain(“executionStats”)

Example Output

executionStats:

{

   nReturned: 3,

   totalDocsExamined: 6

}

Explanation

* nReturned

    * Number of matching documents returned.

* totalDocsExamined

    * Total documents MongoDB checked during the search.

In this example:

* MongoDB returned 3 documents.

* But it examined all 6 documents.

This is inefficient for large databases.

⸻⸻⸻

3. MongoDB createIndex()

Purpose

The createIndex() command creates an index on a field.

Indexes dramatically improve search performance.

Syntax

db.collection.createIndex({ field: 1 })

Example

db.employees.createIndex({ department: 1 })

Explanation

* department

    * Field to index.

* 1

    * Ascending order.

* -1

    * Descending order.

MongoDB creates an index named:

department_1

⸻

How MongoDB Indexes Improve Performance

After creating the index:

db.employees.find({ department: “IT” }).explain(“executionStats”)

Example result:

executionStats:

{

   nReturned: 3,

   totalDocsExamined: 3

}

Improvement

Before index:

* Examined 6 documents.

After index:

* Examined only 3 documents.

MongoDB now searches through the index first instead

of scanning the entire collection.

⸻⸻⸻

4. MongoDB getIndexes()

Purpose

Displays all indexes created in a collection.

Syntax

db.collection.getIndexes()

Example

db.employees.getIndexes()

Example Output

[

   { key: { _id: 1 }, name: “_id_” },

   { key: { department: 1 }, name: “department_1” }

]

Explanation

* _id_

    * Default MongoDB index.

* department_1

    * Custom index created on the department field.

⸻⸻⸻

5. MongoDB dropIndex()

Purpose

Deletes an existing index.

Syntax

db.collection.dropIndex(“index_name”)

Example

db.employees.dropIndex(“department_1”)

What It Does

Removes the custom index from the collection.

After deletion:

db.employees.getIndexes()

Only the default _id index remains.

⸻⸻⸻

Advantages of MongoDB Indexes

* Faster query execution

* Better application performance

* Reduced collection scanning

* Improved scalability

* Faster filtering and sorting

⸻

Disadvantages of MongoDB Indexes

* Consume additional storage

* Increase RAM usage

* Slow down insert and update operations

* Too many indexes reduce performance

* Require maintenance in large databases

⸻⸻⸻

Best Practices for MongoDB Indexing

* Create indexes only on frequently queried fields.

* Avoid unnecessary indexes.

* Use compound indexes carefully.

* Monitor performance using explain().

* Remove unused indexes regularly.

⸻⸻⸻

Conclusion

MongoDB indexes are essential for building fast and scalable applications. Without indexes, MongoDB scans entire collections, which becomes slow for large datasets. By creating indexes on frequently searched fields, developers can dramatically improve database performance and reduce query execution time.

Understanding commands like:

* find()

* explain()

* createIndex()

* getIndexes()

* dropIndex()

is fundamental for every MongoDB developer.

When Code Becomes Home: A Web Developer and Translator’s Journey

My Digital Escape: Coding Away Homesickness

A Modern Nomad’s Story
I sit glued to the screen, pouring my lifetime into app development, web dev, and translating. But here’s the magic: it’s not just work; it’s my personal sanctuary against homesickness. Away from home? No problem – code becomes my homeland!

Why This “Screen Life” Heals My Heart:

  • Flow State Magic: Building apps/websites = total immersion. Time flies, worries fade. Psychologists call it “flow” – pure joy in creation!
  • Global Connections: Translating links me to cultures (Iran? World?). Web dev deploys sites seen by thousands – feels like “home” reaching everywhere.
  • Achievement High: Deploy an app → Instant dopamine! Beats scrolling social media for nostalgia.
  • Flexible Freedom: Work from anywhere (coffee shop, hotel). Homesick? Code a family chat app!

Real Talk: Balancing It Out

  • Pros: Self-reliant income, skills forever (AI can’t fully replace creativity yet), pleasant routine.
  • Cons: Eye strain, isolation. I use 20-20-20 rule (every 20 min, look 20 ft away for 20 sec), daily walks, video calls home.

Inspo Quote: “Code is poetry” – I turn pixels into purpose. What’s next for me?

Coding, My New Homeland: How Dev Beats Homesickness

Coding, My new Homeland

A Modern Nomad’s Story

I spend much of my time in front of a screen, working on app development, web development, and translation. But for me, technology is more than just work. It has become a creative space where I can focus, build, learn, and feel at home—even when I am far from home.

When everything around me feels unfamiliar, coding gives me something familiar to return to. A new Flutter project, a SwiftUI interface, or a challenging problem can quickly pull my attention away from homesickness and toward creating something useful.

Why This “Screen Life” Helps Me

  • Finding Flow: When I am deeply involved in building an app or website, hours can pass without me noticing. Solving problems and seeing an idea gradually become a working product gives me a strong sense of purpose.
  • Staying Connected: Technology has no real borders. Through development and translation, I can work with ideas, people, and cultures from different parts of the world. Even when I am physically far from home, I still feel connected.
  • The Satisfaction of Building: There is something special about turning an idea into a functioning application. Every feature completed and every problem solved provides a small sense of achievement.
  • Freedom to Work Anywhere: Development gives me flexibility. Whether I am working from home, a café, or another country, my laptop provides a familiar workspace.

More Than Just Work

Coding has gradually become part of my daily routine and identity. SwiftUI gives me the tools to create native iOS experiences, while Flutter allows me to build applications across platforms. Backend technologies and databases such as MongoDB help transform those interfaces into complete products.

Every project brings a new challenge: an interface to improve, an API to connect, a bug to solve, or a feature to design. That constant process of learning keeps me moving forward.

Keeping a Healthy Balance

Of course, spending long hours at a computer has disadvantages. Eye strain, too much sitting, and isolation are real concerns.

I try to balance screen time with regular breaks, walking, exercise, and conversations with family and friends. I also use the 20-20-20 rule: roughly every 20 minutes, I look at something about 20 feet away for at least 20 seconds.

Technology works best for me when it supports life rather than replacing it.

Turning Pixels Into Purpose

There is a well-known expression in the programming world: “Code is poetry.”

For me, that idea goes beyond writing elegant software. Coding gives structure to ideas and turns imagination into something people can actually use.

Being away from home can sometimes be difficult, but development has given me a portable creative space—a place where I can continue learning, building, and moving forward.

Wherever I open my laptop, there is another problem to solve and another idea waiting to become real.

Basic CRUD Operations

hey what is up everyone and welcome back to another

video today’s video we continue with the mongodb

crash course so in today’s video we’ll be doing basic

crite operations grad stands for create read update and

delete so doing all of the basic things that most

applications need from their database so we’re just

taking a quick look at that playing around in database

just getting you used to how all of these things work

together and then we continue diving deeper into

individual topics so a concept i want to revisit from the

previous video is how mongodb is structured so the

idea behind a database a collection and a document so

the white part represents the server so on our server we

can have multiple databases and under a database we

get collections so under collections we get documents

so this is the tree of how it works down so if you

understand this concept that we navigate into a

database then into a collection and then we query

whatever documents we’d like in that in that collection

so if you understand that then it will make following

the course really really easy okay so now that you

you’ve seen that little bit of theory i just want to show

you the two ways of starting your mongodb server and

opening the shell so the first one is if you followed my

tutorial we have this bat file that just runs a script it

navigates into the installation directory and then it runs

mongod which is the server and then it runs the shell

so basically this will happen it runs the server and then

it pops up the shell here i can run mongodb commands

just like that okay so that’s the one way if you’re not

doing it like that and you use a different operating

system you just open a terminal after you follow the

installation guide and then you can say sudo mongo d

it’s important to run mongod first but i’m not on mac or

linux so i can just say mongod and then it will start the

server and then in the second terminal you just run

mongo or once again sudo in front if you’re on the

other two just like that and now i’m in the shell with

this terminal just like that okay so i’ll be using the bat

file because it just makes it really quick to open i don’t

really do much but with that out of the way let’s

continue okay so now that we have started the

mongodb server and the shell we can enter our first

command and this is show dbs basically what this

would do it would just list all of the available databases

that is running on your server so we want to create our

own one so databases are created implicitly so you can

create it without it even existing or you can use it

without it even existing it will just create it so for

example we can see there is no database called shop so

if we say use shop we would think it won’t work but it

would just see okay there is no shop and you want to

use a shop so let’s create a shop so if we do that it can

we can see it says switched to db shop so now if i were

to run show dbs again you would see it doesn’t show

up and the reason for this is we did create this database

but there’s no data inside of it yet so it doesn’t show up

here so now we have to create a collection and inside

of this collection we have to add a document so that

there is actual data in this database so let’s create a

collection so in order to create a collection we can first

of all see that there is no collections if i type in show

collections it will show me the collections of the

current database i am switched into so the shop

database currently has no collections so in order to

create one we say db dot and then the collection name

so i’ll give it the name of stock and we can say insert

one just like this and then at the end of this we add a

document that has a json-like syntax so here we can

place in title and we don’t the key value pair we don’t

have to add the quotation marks around the key part we

only have to do it when there’s a string for the value

part so we can say here a book and it has a price so

comma price of 299. so if i were to press enter now we

can see acknowledge true and insert it into this into

the database with this unique id so now if i were to say

show dbs we can see shop shows up here because if

we go into shop and say show collections we can see

there’s a stock collection now so if we want to see what

is inside of the stock collection in the show we just say

db.stock dot find and then we pass it empty empty

parameters and then we press enter and we can see the

data inside so now if you want to print this data out in

a more readable fashion especially when the collection

gets rather large then printing it out in this fashion just

makes it easier easier to read so press up arrow key and

say dot pretty as a function and then it would print it

in this json-like syntax so if you look at this way the

data is stored and to this which is actual json you can

see it is basically the exact same mongodb just uses

bson which stands for binary json so um it’s basically

the same format so if you’ve worked with apis or json

before then understanding how the data looks is pretty

straightforward okay so now that we have seen how to

create a database in a collection let’s see how we can

delete one so if you wanted to delete a database you

can just go into the database by saying use shop for

example and then now we’re inside of the database we

can say db.job database just like this so if you do that it

would say okay shop is dropped and if you would

would you drop a collection you would just say

db.stock dot drop just drop like this and it would drop

the collection but there currently isn’t any collection

because i deleted the database so this is how you would

do these few things okay so in my slides i’m going to

show you the most important crowd operation

commands in mongodb so let’s go over to that okay so

now that we have played around in the database for a

little bit let’s look at some of the most important

commands for creating documents the most important

two commands are insert one and insert many so insert

one allows you to insert one data object at a time and

then it takes in some options separated by a comma

then we have insert many that takes an array of data

objects and also some options we’ll take a look at these

options in more depth when we get to the individual

operation videos then with the read we have find and

find one so this is basically the reading the the

querying of the data so then we have some filter so you

want to find something by some filter we’ll look at

how we can structure these filters in the individual

videos in much more depth and string different queries

together to find the right data and then the options on

both of these would be some type of projection if you

would like to change certain fields to show or not so

find one obviously just returns the first instance where

the filter was found to be true with update we have

three so we have update one which takes in a filter then

the data you want to update and then some options the

menu also takes in a filter and then also some data

which you want to change them with and then some

options then we have replace one and replace one is

basically the data overwrites the update completely so

it doesn’t just add new fields it completely overwrites

so this is if you want to completely override a data

entry or a document and then for delete we have delete

one and delete many delete one by a filter and then

some options and then delete many by some filter so

delete one obviously will only delete one where the

filter is true delete many will delete all of them where

the filter is true okay so first let’s start off by using

insert one for one more time i’ve used it previously

before but let’s quickly create our database so we don’t

have a database and we want to create a database and

say use blogger just like this and we want to create our

user so we can say users dot insert one and then we add

in the user and i said a user looks as follows so it has a

name and this would be me lloyd and it will have a

surname just like this jvr and it will have an email and

this can be gmail.com okay and then we’ll have an

address and this address is going to be another

document so another object and inside of this we have

city and we say new york and inside there we have one

more which is street and this would be wall street and

then we have one last thing so outside of this one um

that is correct we’re still inside here so we say hobbies

and hobbies will be an array of list so let’s say soccer

and let’s say programming just like this so if i would

say enter now we can say acknowledgement is true and

it inserted the with a unique id so you might ask why

am i doing this in the shell why can’t i just type it in

visual studio you can and then just paste it in the

reason i do it in the shell is because this really lets me

think about what i’m doing it makes me feel more

using mongodb from the core okay so let’s insert more

users but this time using insert many so if i were to

clear this and go to show dbs we can see blogger is

there now now you can say show collections to see the

users collection and here we can say find user dot find

dot pretty just like this okay and there we can see the

one so let’s add two more users i’m going to do this by

using insert mini so i’m going to say db.users dot insert

many and this takes an array of documents so we want to insert many so the first one will be name of tywin

and the surname of lannister not even sure if i’m

spelling that correctly and then we’ll have an email of

tywin gmail.com which they probably didn’t live in but

whatever and then we have address and this is once

again a document and we can say city is equal king’s

landing and then street red street just like this then we

can add one more thing which is hobbies and this could

be um horse riding like this i’m not even sure if it’s two

words anyway okay so that is one document so now we

go after this curly brace and add another document so

this would be another user so we can say name jimmy

from our surname and this would be you jimmy you i

don’t know email and gym gmail.com just like this

then we have address which would have city of la and i

don’t know any streets in la so i’m just gonna say street

abc just like this and then the last one is hobbies and

this is once again an array and let’s just say exercise

just like that and now we cross our fingers and hope it

goes through let’s say this again it acknowledged and

we have two entries with their unique ids so now if we

were to go and db.users.find here we can see the users

let’s print it out pretty because that’s just not readable

for me okay and here we have our users user one user

two and user three so we would like to be able to

update something from a specific user so now that

we’ve inserted let’s try and update a username so i’m

just going to clear this and then let’s try updating okay

so now we want to update some of the data so let’s just

quickly look at the data again so what i’m going to try

and update is i’m going to find this user by this id and

i’m going to update its city to something else so let’s do

that i’m going to say db users.update1 and then some

filter with some data the filter will be where the

underscore id is equal to this id so i’m just selecting it

just leaving it like that and then right clicking twice

and then it pastes it in okay and now i want to set

something on this user i said i wanted to change the

address um city so i want to change the address to

whatever i want to then i can say city texas and i

update should put semicolons around texas update i

can see the acknowledgement was true i can find my

users again and now i can see that it updated the

address but it completely removed the street and the

reason for this is because i have reset this it’s the same

as within the array i have totally reset this so if i

wanted to go back so let’s reset this street just like this

and i save and i go back now it would be the same as

previously now i just want to update the new york so i

would go and do the following okay so if i clear that

now i want to update only the city so my data looks

like this okay i only want to make that texas so i’m

going to say the following db users dot update 1 i pass

in the filter and then the data and for the filter i want it i

don’t have its id now i think let’s see i do okay um

where the object id the underscore id is equal to this

object id and then i change by saying dollar sign set

and i want to change and this is where the secret

happens so here i can nest into another document with

the dot notation but this requires the key to have

quotation marks around it so this would be inside of

address so quotation mark address dot city and then

close the quotation marks so this now is only going to

sit inside of the address document the city key it’s

going to change it and we’re going to set this equal to

texas so if i were to save this and run i can see it

acknowledged one and it updated once so let’s search

again and here we can see that it didn’t completely

override the entire document it just changed the city to

texas so that’s how you would update something like

that okay so now that we’ve seen how update 1 works

let’s update many so let’s say we want to add

something new to all of our users that is a new feature

say and let’s say relationship status so i’m going to say

db users dot update mini then i pass in the filter and

then i pass in what i want to update so i want to update

everything all of my user entries so i’m just going to

leave it blank and i want to add a field relationship

status and initially set everyone everyone’s status to

unknown and they can later go and update it

themselves in your application so if i do this and set oh

i forgot to add the underscore set and then closing the

brackets if i update it like this we can see there was

three match counts because i searched for everything

and it modified three things so let’s go check in our

data by finding all our users we can see all of them has

this relationship status unknown field so if one of them

would you go and change it so let’s quickly find them

and let’s change one of them users dot update one i’m

doing update one again just quickly where the

underscore id is equal to this person and we want to

change so dot set the relationship status relation to

single just like this and update now if we close it and

search for our users again we can see these are all

unknown and then this one is changed to single so

that’s how we would update something so let’s quickly

take a look at a few ways to query how we can use the

find in in more advanced ways okay so now we want to

use the find method so first let’s quickly recap by

adding a few posts so i’m going to say db post so if i

show collections we currently only have users so i

want to create a post collection and i’m going to use

insert menu and we want to create posts i’m going to

create so it’s an array of posts i’m going to create let’s

say three posts the first post is going to have a caption

first one it’s going to have a body something cool for

post one and i know this is really repetitive but this is

how you are going to have to get used to working with

data if you’re especially if you’re a back-end engineer

you should learn to work with data fast and in this type

of raw format so okay then we have the author this

lloyd if you want to create a relationship you’ll add a

unique relationship you’ll add the user id i don’t have

that now then we have tags which is an array of strings

that is of hunting and swimming just like this this is

these are the tags and then the next one we have a

caption post 2 we have the body something also

random and then we have author i’m just going to set

this equal to tywin and then we can add the tags and

here i’m going to add swimming rich live just like that

okay and then the last one we can add caption and we

set the sql to post three give it a body just like this and

then we add the last thing which is the tags just like

this okay and here we can add voting yolo something

like that and we add this and we can see it created three

new entries and then we can start finding on them so

the you one you see me used all the time is one which

is just the empty empty parentheses so this would just

find all of the posts so now i want to find a post by say

its tags so i can say db.post.find and pretty this once

again and i can find something in a filter and here i can

say where the tags is equal to swimming so it should

give us these two because those who have swimming

so if you print it out you can see those two were

selected and you can use different type of things on the

property for swimming so let’s say we want to find

everything where the tags are equal to swimming or

there is a tag that exists that is equal to swimming so

this is important to note if you want this checks if there

is a swimming tag that exists in the array it does not

check that that is the only thing in the array if you want

to check that it’s the only thing in the array then you

place array brackets around it like this so now it will

find nothing because none of these has only swimming

okay but let’s remove that and let’s use something

called projection to only display or send back the

necessary fields so i want to find every post where the

tags contain swimming and i only want the author’s

name so here i can say author and set this equal to one

and then then if i press search i see it printed out these

two it gives me the id it always sends you back the id

as well and then the author name so this is something

called projection so i projected it by adding the options

object and inside of the objects i specified author with

a one so zero would be false so if i for instance don’t

want to show this id i can up arrow key and with the

underscore id you should specifically say zero for it to

not show so now if i did and press enter you only see

the author’s names so and then the last i think crowd

operation so we’ll dive deeper into more finding

operations in the individual video but the last thing for

quite operations will be the delete one and delete menu

so if we go back to the users and say db.users.find

look pretty we can see all of these that has relationship

status of unknown i want to delete so that would be a

delete many or for instance if you only want to delete

the first one you find that has unknown it will delete

only the first one it finds to be true so let’s delete one

okay so i’m first going to do something that lets us

delete this entry right over here so i’m going to say

db.users dot delete one i send in some filter and in here

i want where the name is equal to jimmy just like this

sorry jimmy okay there we have deleted it so if i clear

and i search the users i only see two and another neat

thing you can do if you don’t want to see how all the

data you just say count and then it just gives you the

the amount of documents inside of the collection okay

so now if i wanted to delete the users that has an

unknown relationship status so here i’m going to say

dbusers.delete many because i know it’s more than one

and here i can say where relationship status is equal to

unknown just like this boom and you can see

acknowledge true and it deleted too so now if i were to

go back to db users dot find i will see nothing is being

returned because i just deleted everything okay so this

is basically um this for this video i just tried and went

over all of the basic things so you can see how the rest

of this course will be going i would mainly be using

the shell i would giving little scenarios and then i

would just play those queries out inside of the shell

inside of the shell so that you just get the typing

experience and the muscle memory with the learning

of why and how okay so that is the end of the video

today i just have to mention that the most important

things and the in detail work is going to be done in

these sections these crud operations sections where i

focus on each individual aspect of creating reading

updating and deleting data from your mongodb

database so these first few is just to get us to

understand what exactly are we doing and why are we

doing it and just working with terminology and just

playing around a little bit to get the feeling of what is

going where so stick with me through this course and

then hopefully at the end you got a lot out of it but

thanks this is all for the video for today and then i’ll see

you in the next one cheers