Several years ago, I built my first website in WordPress. I created pages, added content, and gradually worked on the site until it felt more complete. At the time, I wasn’t publishing blog posts. Everything went into pages.
The website took much longer to finish than I expected. When I finally decided to try Google AdSense, I hoped it would be the next step forward. Instead, my application was rejected again and again.
Each rejection was frustrating. I had already spent so much time building the site, and I struggled to understand what I needed to change.
The advice that made me feel I had to start over
A friend who worked in web development looked at my situation and suggested that I publish my article content as posts rather than keeping everything in pages. He thought I would need to recreate the content and delete the old versions.
That was difficult to hear. The thought of rebuilding work that had already taken so long left me discouraged. I wanted to improve the website, but I didn’t want to copy everything manually and begin again.
Looking back, there were two separate questions: how to organize my WordPress content, and why AdSense had rejected the site. Changing the first would not necessarily answer the second.
How AI helped me find a simpler approach
Before committing to a complete rebuild, I asked an AI assistant whether there was an easier way to turn existing pages into posts.
It suggested a WordPress plugin called Post Type Switcher.
The plugin lets you change an existing item’s content type, including converting a page into a post. It also supports bulk changes. That meant I had an alternative to manually recreating each article. See the plugin’s official description.
I used it to convert many of my pages into posts. For me, its value was practical: it made a task that had felt overwhelming much more manageable.
What this taught me about pages, posts, and AdSense
There is an important correction to the advice I originally received: AdSense does not require you to publish your content as WordPress posts rather than pages. Google’s published requirements focus on original, useful content, policy compliance, and a website that visitors can navigate. They do not specify a WordPress content type. Read Google’s eligibility requirements and site-readiness guidance.
Posts can help organize a growing collection of articles through categories and a blog archive. Pages still have a useful role for content such as About, Contact, and service information.
The right choice depends on what the content is for. Turning a page into a post does not improve the writing by itself, and it does not guarantee AdSense approval.
I also cannot conclude from this experience that using pages was the reason for my rejections. What I can say is that the plugin helped me reorganize existing content without manually recreating it.
What I recommend before converting content
If you are in a similar situation, Post Type Switcher may be worth considering. Start with a backup and test one item on a staging copy before making bulk changes. The plugin’s documentation notes that conflicts with other plugins can occur. Plugin documentation.
After a conversion, check these details:
Layout: Does the article still display correctly, especially if it uses a page builder?
Address: Has the URL changed? If so, redirect the old address to the new one.
Navigation: Do menus and internal links still lead to the right place?
Organization: Does the article appear in the intended category and blog archive?
You do not need to convert every page. Choose the content that belongs in your article collection, and keep other pages where they make sense.
A small tool made a difficult task feel possible
The most useful part of this experience was discovering that I had another option. I could reorganize what I had already written instead of assuming I needed to rebuild everything.
AI helped me find the tool, and Post Type Switcher helped me carry out the change. The experience also reminded me to check the reasoning behind advice, even when it comes from someone with more experience.
If your WordPress articles are currently stored as pages, this plugin could save you some work. If your goal is AdSense approval, review the quality and usefulness of the whole website as well. Content organization is one part of that work.
https://kiaapp.xyz/wp-content/uploads/2025/09/favicon2-4-300x200.png00Kiahttps://kiaapp.xyz/wp-content/uploads/2025/09/favicon2-4-300x200.pngKia2026-10-03 15:12:072026-10-03 22:10:51Repeated AdSense Rejections Led Me to Rethink My WordPress Content
Have you ever launched a product that looked impressive… but didn’t truly solve anything meaningful?
Many teams move quickly into development. Features get built. Interfaces look polished. But somewhere along the way, the real problem gets lost.
That’s why product thinking matters.
Product thinking is a strategic mindset that starts before design and development. It asks a simple but powerful question:
What real problem are we solving — and for whom?
Instead of focusing only on features, it focuses on value.
A Complete View of the Product Journey
Product thinking looks at the entire lifecycle of a product:
Idea and validation
User research
Design and development
Launch and iteration
Long-term growth
It connects strategy with execution. It ensures that every decision serves a clear purpose.
1. User-Centered by Design
At the heart of product thinking is empathy.
Teams invest time in understanding user behavior, frustrations, motivations, and goals. Rather than assuming what people need, they validate insights through research and feedback.
When products are built around real needs:
Adoption increases
Satisfaction improves
Loyalty strengthens
Users don’t just use the product — they depend on it.
2. Solving the Right Problems
Feature-first development often leads to complexity without clarity.
Product thinking slows the process down — in a productive way. It encourages teams to identify the core challenge before proposing solutions.
This approach ensures:
Features are meaningful
Resources are used wisely
Development stays focused
Nothing is built “just because.” Everything has a reason.
3. Alignment with Business Strategy
A product should support broader company objectives.
Product thinking connects product decisions with business goals such as:
Revenue growth
Market expansion
Brand positioning
Competitive differentiation
When strategy and product development move in the same direction, momentum builds.
4. Cross-Functional Collaboration
Strong products are not created in isolation.
Product thinking brings together:
Designers
Engineers
Marketing teams
Sales and customer support
Each perspective strengthens the outcome. Collaboration reduces blind spots and improves decision-making across the board.
5. Continuous Validation and Market Fit
Markets evolve. User expectations shift.
Product thinking embraces testing and iteration. Ideas are validated with real users before scaling. Assumptions are challenged early, not after launch.
This leads to better product-market fit and faster adaptation to change.
6. Quality and Consistency
When teams share a user-focused mindset, the entire product feels cohesive.
Design, functionality, and messaging align under one clear principle: delivering value.
This consistency builds trust — and trust drives retention.
7. Meaningful Innovation
Innovation is not about adding more. It’s about understanding deeper.
By focusing on underlying problems, teams discover smarter and often simpler solutions. These insights lead to differentiated features and stronger competitive positioning.
8. Scalability and Long-Term Vision
Product thinking extends beyond launch day.
Products built on validated problems and strong foundations are easier to scale. As the user base grows, the solution evolves naturally.
This mindset supports sustainable, long-term success — not just short-term releases.
The Strategic Advantage
Product thinking transforms development from a task-based process into a strategic discipline.
It helps organizations:
Build what truly matters
Reduce waste
Deliver measurable value
Innovate intentionally
Scale with confidence
In today’s fast-moving, user-driven market, this approach is not optional — it is a competitive advantage.
If your goal is to build products that last, product thinking is where the journey begins.
https://kiaapp.xyz/wp-content/uploads/2025/09/favicon2-4-300x200.png00Kiahttps://kiaapp.xyz/wp-content/uploads/2025/09/favicon2-4-300x200.pngKia2026-09-14 13:52:522026-09-17 23:05:41Why Product Thinking Comes First Have you ever launched a product that looked impressive… but…
Deploying and Connecting the i9 AI Agent to WordPress
Why Users Complain About Digital Assistants: The Real Problems Behind Smart Features
As smart applications continue to evolve, digital assistants, AI recommendations, and automation tools have become central to modern user experiences. From shopping apps to banking platforms, these intelligent features promise convenience, speed, and personalization.
But there’s a growing problem.
Based on insights from KiaApp’s analysis of smart app behavior, many users are increasingly frustrated—not because the technology is weak, but because it often fails to align with real human expectations.
The biggest complaints about digital assistants reveal one clear truth:
Intelligence without transparency creates distrust.
1. Lack of Transparency and User Control
One of the most common complaints about digital assistants is simple:
“The app changed something without telling me.”
This frustration points to a serious flaw in many AI-powered systems. Digital assistants often make decisions behind the scenes—changing settings, filtering content, triggering workflows, or saving personal preferences—without clearly explaining why.
While automation is designed to save time, hidden decisions can feel invasive.
Users want three things:
To know what changed
To know why it changed
To have the power to undo or adjust it
Without these controls, even advanced AI features feel unpredictable.
Why it matters:
A smart assistant should support human decisions, not replace them without permission.
2. Blocking Access to Human Support
Another major complaint sounds like this:
“I just want to talk to a real person.”
This is one of the most damaging mistakes in digital assistant design.
Instead of helping users solve problems, some assistants trap them in endless loops of automated replies, repetitive questions, and irrelevant suggestions.
This becomes especially critical in industries like:
Banking
Insurance
Healthcare
Travel
In these situations, users are often stressed and need fast, accurate human help.
When AI refuses to step aside, it stops being helpful and becomes a barrier.
Best practice:
Smart systems must know their limits and provide a clear path to human support.
3. No Explanation Behind Decisions
A major weakness in many AI assistants is the inability to explain:
“Why this option and not another?”
For example:
Why was this product recommended?
Why was this payment method selected?
Why did the app choose this route or schedule?
Most assistants give answers without showing the reasoning behind them.
This creates uncertainty.
If users don’t understand the logic, they can’t judge whether the recommendation matches their actual needs.
This is where trust breaks.
The solution:
AI should explain its reasoning in simple language, especially when multiple options exist.
4. Too Much Talking, Too Little Value
Another common complaint:
“It talks too much but says very little.”
Many digital assistants overload users with:
Long responses
Generic explanations
Repetitive instructions
Unclear answers
This becomes even worse when the assistant misunderstands the same question multiple times.
Instead of reducing effort, the interaction becomes exhausting.
Good digital assistants should be:
Fast
Direct
Context-aware
Easy to understand
Users value clarity more than complexity.
The Future of Smart Assistants: Human-Centered AI
The future of AI-powered apps depends on one important principle:
Respect the user’s intent.
Digital assistants should:
✔ Explain their actions ✔ Offer easy controls ✔ Escalate to humans when needed ✔ Adapt to changing context ✔ Keep communication clear and concise
The smartest assistant is not the one with the most advanced algorithm.
It’s the one that makes users feel understood, respected, and in control.
Final Thought
Smart features are no longer optional in modern apps.
But if they ignore transparency, flexibility, and human needs, they quickly become a source of frustration.
The lesson is clear:
Technology should feel like help—not like resistance.
Why Users Complain About Digital Assistants: The Real Problems Behind Smart Features
As smart applications continue to evolve, digital assistants, AI recommendations, and automation tools have become central to modern user experiences. From shopping apps to banking platforms, these intelligent features promise convenience, speed, and personalization.
But there’s a growing problem.
Based on insights from KiaApp’s analysis of smart app behavior, many users are increasingly frustrated—not because the technology is weak, but because it often fails to align with real human expectations.
The biggest complaints about digital assistants reveal one clear truth:
Intelligence without transparency creates distrust.
1. Lack of Transparency and User Control
One of the most common complaints about digital assistants is simple:
“The app changed something without telling me.”
This frustration points to a serious flaw in many AI-powered systems. Digital assistants often make decisions behind the scenes—changing settings, filtering content, triggering workflows, or saving personal preferences—without clearly explaining why.
While automation is designed to save time, hidden decisions can feel invasive.
Users want three things:
To know what changed
To know why it changed
To have the power to undo or adjust it
Without these controls, even advanced AI features feel unpredictable.
Why it matters:
A smart assistant should support human decisions, not replace them without permission.
2. Blocking Access to Human Support
Another major complaint sounds like this:
“I just want to talk to a real person.”
This is one of the most damaging mistakes in digital assistant design.
Instead of helping users solve problems, some assistants trap them in endless loops of automated replies, repetitive questions, and irrelevant suggestions.
This becomes especially critical in industries like:
Banking
Insurance
Healthcare
Travel
In these situations, users are often stressed and need fast, accurate human help.
When AI refuses to step aside, it stops being helpful and becomes a barrier.
Best practice:
Smart systems must know their limits and provide a clear path to human support.
3. No Explanation Behind Decisions
A major weakness in many AI assistants is the inability to explain:
“Why this option and not another?”
For example:
Why was this product recommended?
Why was this payment method selected?
Why did the app choose this route or schedule?
Most assistants give answers without showing the reasoning behind them.
This creates uncertainty.
If users don’t understand the logic, they can’t judge whether the recommendation matches their actual needs.
This is where trust breaks.
The solution:
AI should explain its reasoning in simple language, especially when multiple options exist.
4. Too Much Talking, Too Little Value
Another common complaint:
“It talks too much but says very little.”
Many digital assistants overload users with:
Long responses
Generic explanations
Repetitive instructions
Unclear answers
This becomes even worse when the assistant misunderstands the same question multiple times.
Instead of reducing effort, the interaction becomes exhausting.
Good digital assistants should be:
Fast
Direct
Context-aware
Easy to understand
Users value clarity more than complexity.
The Future of Smart Assistants: Human-Centered AI
The future of AI-powered apps depends on one important principle:
Respect the user’s intent.
Digital assistants should:
✔ Explain their actions ✔ Offer easy controls ✔ Escalate to humans when needed ✔ Adapt to changing context ✔ Keep communication clear and concise
The smartest assistant is not the one with the most advanced algorithm.
It’s the one that makes users feel understood, respected, and in control.
Final Thought
Smart features are no longer optional in modern apps.
But if they ignore transparency, flexibility, and human needs, they quickly become a source of frustration.
The lesson is clear:
Technology should feel like help—not like resistance.
https://kiaapp.xyz/wp-content/uploads/2025/09/favicon2-4-300x200.png00Kiahttps://kiaapp.xyz/wp-content/uploads/2025/09/favicon2-4-300x200.pngKia2026-09-14 13:48:302026-09-17 18:39:53Deploying and Connecting the i9 AI Agent to WordPress Why Users Complain About Digital…
Add Your Deploying and Connecting the i9 AI Agent to WordPress
I created my i9 AI Agent with Python and Google ADK. It uses MongoDB as its NoSQL database. After testing the agent on my Mac, I prepared it for uploading to my host.
First, I put all the project files in one folder and compressed the folder as a ZIP file. I did not include my API keys or passwords in the ZIP file because this information must stay private.
Next, I opened cPanel and went to File Manager. I uploaded the ZIP file to the correct folder and extracted it. Then, I configured the Python application, installed the required packages, and added the API key as an environment variable. After starting the application, my agent received a public HTTPS link.
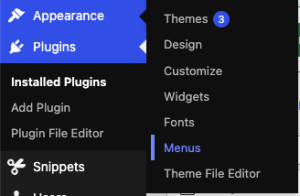
To connect the agent to my WordPress website, I entered the WordPress dashboard. Then, I went to Appearance → Menus.
Go to Appearance and select Menus in the WordPress dashboard.
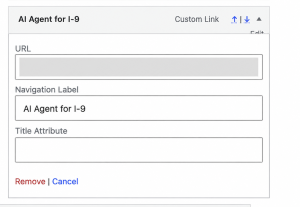
I selected Custom Links, entered the agent’s public link, and used AI Agent for i9 as the navigation label. Finally, I added it to the menu and clicked Save Menu.
Now visitors can open and use my AI shopping assistant directly from the website menu.
Add the agent’s public URL and enter “AI Agent for i9” as the navigation label.
Add Your Heading Text Here
https://kiaapp.xyz/wp-content/uploads/2025/09/favicon2-4-300x200.png00Kiahttps://kiaapp.xyz/wp-content/uploads/2025/09/favicon2-4-300x200.pngKia2026-08-27 21:16:582026-09-17 18:32:05Deploying and Connecting the i9 AI Agent to WordPress
This guide explains how to build a store assistant like yourOwnAgent: a program that answers only from a real product list. It runs on a Mac with Python. It is not a WordPress plugin, and it is not a static HTML page.
The agent has a simple job. A customer asks about a pump, a valve, or a price. The agent searches the store catalog, then answers with names, categories, prices, and links that exist in that list. If the item is not in the catalog, it says so. It does not invent products.
What the agent is made of
Four parts work together:
The brain — a Gemini model with written rules (answer only from the catalog, same language as the customer, keep replies short).
Tools — small functions the brain is allowed to call, such as product search and an optional Telegram notice.
The catalog — the real store data: product names, categories, prices in toman, and product URLs.
Keys and settings — a Gemini API key and the path or address of the catalog. These stay in a local .env file and are never published.
Chat stays short on purpose. A search may match thousands of items. The model receives one page (for example 20 products) plus the exact total. The full list belongs in a catalog page, not in a long chat message.
What you need on a Mac
A Mac with internet access
Python 3.11 or newer
A Gemini API key from Google AI Studio
A product file or a product API (JSON with names, prices, and links)
Install Apple’s command-line tools if they are not already installed:
__init__.py must import the agent package so the ADK runner can find it:
python
from . import agent
Configure the Mac environment
Copy the example file and edit .env in a text editor. Put the Gemini key there. Point the catalog to a JSON file on the Mac, or to a running product API.
Do not upload .env to GitHub or to the website. It contains secrets.
Load the file in Terminal before every run:
bash
cd ~/Agents/yourOwnAgent
source .venv/bin/activate
set -a && source .env && set +a
Write the agent
agent.py defines the name, the model, the rules, and the tools. The rules should include:
Call product search before any answer about name, price, category, or stock
Use only rows returned by that search
Never invent products, prices, or brands
If search returns nothing, say the item is not in the list
Answer in the same language as the latest message (Persian or English)
For a budget question, wait until the customer types an amount, then search with that exact figure in toman
Keep the chat short; report the exact match count from the tool
tools.py exposes search (and optional Telegram) as functions the model can call.
catalog_api.py talks to the store API, or reads the local JSON if the API is down. That file is the source of truth for prices.
Run it on the Mac
From the project folder, with the virtual environment and .env loaded:
bash
adk web .
This opens a local developer chat in the browser, usually at http://127.0.0.1:8000. Ask a real catalog question, for example a pump price in Persian. The agent should call search first, then answer from those results.
If the catalog is served by a local backend, start that backend in a second Terminal window so search is not empty.
Optional commands:
bash
adk run your_own_agent
adk api_server --host=0.0.0.0 --port=8080 .
adk web is for building and testing on the Mac. adk api_server is the form used later if the agent is connected to a public website chat bubble.
How a good answer looks
For a product question, the agent should:
Search the catalog once
State the exact number of matches
Give a short sample (name, category, price in toman, link)
Direct the customer to the store site or support for a final check before purchase
It should refuse politics, coding help, other shops, and any product that is not in the list.
What this agent is not
It is not an HTML file to upload into WordPress. Without the Python process, there is no agent.
It is not a generic website chatbot that talks to Gemini with no product tool. That setup will guess and invent items.
It is not a page that prints the entire catalog in one message. Large results belong in a catalog view; chat only reports the total and a sample.
Checklist before you call it finished
Python virtual environment works on the Mac
.env has a valid Gemini key and is not published
Catalog JSON or API returns real products
A Persian product question returns names and prices from the list
An unknown item is rejected instead of invented
Off-topic questions are refused
That is the whole Mac workflow: install Python, create the project, write rules and a search tool, connect the store list, then run adk web and test.
https://kiaapp.xyz/wp-content/uploads/2025/09/favicon2-4-300x200.png00Kiahttps://kiaapp.xyz/wp-content/uploads/2025/09/favicon2-4-300x200.pngKia2026-08-16 20:40:052026-09-17 18:56:01Explore Smarter Apps and Digital Tools
Why Users Complain About Digital Assistants: The Real Problems Behind Smart Features
As smart applications continue to evolve, digital assistants, AI recommendations, and automation tools have become central to modern user experiences. From shopping apps to banking platforms, these intelligent features promise convenience, speed, and personalization.
But there’s a growing problem.
Based on insights from KiaApp’s analysis of smart app behavior, many users are increasingly frustrated—not because the technology is weak, but because it often fails to align with real human expectations.
The biggest complaints about digital assistants reveal one clear truth:
Intelligence without transparency creates distrust.
1. Lack of Transparency and User Control
One of the most common complaints about digital assistants is simple:
“The app changed something without telling me.”
This frustration points to a serious flaw in many AI-powered systems. Digital assistants often make decisions behind the scenes—changing settings, filtering content, triggering workflows, or saving personal preferences—without clearly explaining why.
While automation is designed to save time, hidden decisions can feel invasive.
Users want three things:
To know what changed
To know why it changed
To have the power to undo or adjust it
Without these controls, even advanced AI features feel unpredictable.
Why it matters:
A smart assistant should support human decisions, not replace them without permission.
2. Blocking Access to Human Support
Another major complaint sounds like this:
“I just want to talk to a real person.”
This is one of the most damaging mistakes in digital assistant design.
Instead of helping users solve problems, some assistants trap them in endless loops of automated replies, repetitive questions, and irrelevant suggestions.
This becomes especially critical in industries like:
Banking
Insurance
Healthcare
Travel
In these situations, users are often stressed and need fast, accurate human help.
When AI refuses to step aside, it stops being helpful and becomes a barrier.
Best practice:
Smart systems must know their limits and provide a clear path to human support.
3. No Explanation Behind Decisions
A major weakness in many AI assistants is the inability to explain:
“Why this option and not another?”
For example:
Why was this product recommended?
Why was this payment method selected?
Why did the app choose this route or schedule?
Most assistants give answers without showing the reasoning behind them.
This creates uncertainty.
If users don’t understand the logic, they can’t judge whether the recommendation matches their actual needs.
This is where trust breaks.
The solution:
AI should explain its reasoning in simple language, especially when multiple options exist.
4. Too Much Talking, Too Little Value
Another common complaint:
“It talks too much but says very little.”
Many digital assistants overload users with:
Long responses
Generic explanations
Repetitive instructions
Unclear answers
This becomes even worse when the assistant misunderstands the same question multiple times.
Instead of reducing effort, the interaction becomes exhausting.
Good digital assistants should be:
Fast
Direct
Context-aware
Easy to understand
Users value clarity more than complexity.
The Future of Smart Assistants: Human-Centered AI
The future of AI-powered apps depends on one important principle:
Respect the user’s intent.
Digital assistants should:
✔ Explain their actions ✔ Offer easy controls ✔ Escalate to humans when needed ✔ Adapt to changing context ✔ Keep communication clear and concise
The smartest assistant is not the one with the most advanced algorithm.
It’s the one that makes users feel understood, respected, and in control.
Final Thought
Smart features are no longer optional in modern apps.
But if they ignore transparency, flexibility, and human needs, they quickly become a source of frustration.
The lesson is clear:
Technology should feel like help—not like resistance.
Why Users Complain About Digital Assistants: The Real Problems Behind Smart Features
As smart applications continue to evolve, digital assistants, AI recommendations, and automation tools have become central to modern user experiences. From shopping apps to banking platforms, these intelligent features promise greater convenience, speed, and personalization.
But there is a growing problem.
Based on KiaApp’s analysis of smart application behavior, many users are becoming increasingly frustrated—not because the technology is incapable, but because it often fails to meet real human expectations.
The most common complaints about digital assistants reveal one important truth:
Intelligence without transparency creates distrust.
1. Lack of Transparency and User Control
One of the most common complaints about digital assistants is:
“The app changed something without telling me.”
This frustration highlights a serious flaw in many AI-powered systems. Digital assistants frequently make decisions behind the scenes, such as changing settings, filtering content, triggering workflows, or saving personal preferences without clearly explaining what happened or why.
Although automation is intended to save time, hidden decisions can feel intrusive and unpredictable.
What Users Expect
Users want three basic things:
To know what changed
To understand why it changed
To have the ability to undo or adjust the change
Without these controls, even the most advanced AI features can become difficult to trust.
Why It Matters
A smart assistant should support human decision-making, not replace it without permission. Transparency gives users confidence and helps them remain in control of their experience.
2. Blocking Access to Human Support
Another major complaint is:
“I just want to talk to a real person.”
Preventing users from reaching human support is one of the most damaging mistakes in digital assistant design.
Instead of helping people solve their problems, some assistants trap them in endless loops of automated replies, repetitive questions, and irrelevant suggestions.
Where Human Support Matters Most
The ability to reach a person is especially important in industries such as:
Banking
Insurance
Healthcare
Travel
In these situations, users may already be stressed and need fast, accurate, and personalized assistance.
When an AI assistant refuses to step aside, it stops being helpful and becomes another obstacle.
Best Practice
Smart systems must recognize their limitations and provide a clear, visible, and immediate path to human support when automation cannot resolve the issue.
3. No Explanation Behind Decisions
Many AI assistants are unable to answer a simple but important question:
“Why did you choose this option instead of another?”
For example, users may want to know:
Why a particular product was recommended
Why a specific payment method was selected
Why the application chose a certain route or schedule
Most assistants provide an answer or recommendation without explaining the reasoning behind it.
How This Damages Trust
When users cannot understand the logic behind a decision, they cannot determine whether the recommendation matches their actual needs.
This uncertainty weakens confidence in the system and can eventually cause users to stop relying on it.
The Solution
AI assistants should explain their reasoning in clear, simple language—especially when several options are available or when a decision could significantly affect the user.
4. Too Much Talking and Too Little Value
Another common complaint is:
“It talks too much but says very little.”
Many digital assistants overwhelm users with:
Long responses
Generic explanations
Repetitive instructions
Unclear answers
The experience becomes even more frustrating when the assistant repeatedly misunderstands the same question.
Instead of reducing effort, the interaction becomes exhausting.
What a Good Digital Assistant Should Be
An effective assistant should be:
Fast
Direct
Context-aware
Easy to understand
Users value clarity and usefulness more than unnecessary complexity.
The Future of Smart Assistants: Human-Centered AI
The future of AI-powered applications depends on one essential principle:
Respect the user’s intent.
Principles of Human-Centered AI
Digital assistants should:
Explain their actions
Provide simple and accessible controls
Escalate to human support when necessary
Adapt to changing circumstances and context
Keep communication clear and concise
The smartest assistant is not necessarily the one with the most advanced algorithm. It is the one that makes users feel understood, respected, and in control.
Final Thoughts
Smart features are no longer optional in modern applications. However, when they ignore transparency, flexibility, and human needs, they quickly become a source of frustration.
The lesson is clear:
Technology should feel like help—not like resistance.
https://kiaapp.xyz/wp-content/uploads/2025/09/favicon2-4-300x200.png00Kiahttps://kiaapp.xyz/wp-content/uploads/2025/09/favicon2-4-300x200.pngKia2026-08-16 18:22:202026-09-17 23:13:58Why Users Complain About Digital Assistants: The Real Problems Behind Smart Features
A website-ready making-of: the programs on the Mac, the Python agent, the product catalog page, and how that page is shown on i-9.ir with an iframe.
What you need on the Mac
I-9 Agent was written and tested on macOS with this toolkit. Nothing here is a WordPress plugin. WordPress only displays the finished page.
Program
Why it was used
Code editor
The editor where the agent, tools, and catalog page were written.
Python 3.13
The language the agent and catalog server run in. A virtualenv (.venv) keeps packages isolated.
Terminal / zsh
Runs adk web for chat, python -m i9_agent.catalog_ui for the list, and gcloud for deploy.
Git
Version control for the I9_Agent project.
Homebrew
Installs extra Mac tools, including the Google Cloud SDK.
Google Cloud SDK (gcloud)
Puts the catalog on Cloud Run so customers can open it, not only localhost.
Accounts and keys (not programs)
A Gemini API key in .env as GOOGLE_API_KEY — for chat.
A Google Cloud project with billing — for hosting. Use a real project such as i9-agent, not Default Gemini Project.
Optional: Telegram bot token — only if the agent should notify an operator.
The I-9 product JSON (or the live shop API) — the agent must not invent products.
Docker Desktop was not required on this Mac. Cloud Run built the container on Google’s side from the project Dockerfile.
What I-9 Agent is
I-9 Agent is the official product assistant for I-9 Group (آیناین). It answers only from the store list. Chat stays short. The full match list loads on a dark RTL catalog page: search, photos, WhatsApp, price, and a link to i-9.ir.
Chat
Google ADK + Gemini
adk web runs the agent locally. Tools: search_i9_products (required before any product answer) and notify_me (Telegram).
Catalog page
Python server + HTML
catalog.html loads 20 products at a time from /api/catalog/search. Photos come from /api/catalog/thumb, fetched from the real i-9.ir product.
How a request moves
Visitor
Opens chat, or opens the catalog (direct link or WordPress iframe).
Agent
Calls search_i9_products once. Does not dump 1,800 rows into the chat. Sends the catalog URL.
Catalog UI
Same query, pages of 20, until the list is complete. Cards show image, WhatsApp, category, price, product link.
i-9.ir
The real shop. Product links and photos belong here. WordPress does not run the Python agent.
How it was built
1. Mac workspace. Install a code editor, Python 3.13, Git, Homebrew, then Google Cloud SDK. Create a virtualenv and install google-adk, requests, and python-dotenv.
2. Agent in the editor. Write i9_agent/agent.py as an ADK agent with a strict catalog-only policy: no invented products, Persian in / English out matching the user, budget taken from the number the user typed.
3. Product search tool.tools.py exposes search_i9_products. i9_api.py reads the I-9 API or local I9_db.json, returns one page of 20, plus total matches and a catalog URL.
4. Catalog page. Chat cannot show 1,898 pumps. catalog_ui.py serves catalog.html: RTL layout, search, infinite load, WhatsApp, product link. Run locally with:cd /Users/kiamalek/Agents/I9_Agent source .venv/bin/activate python -m i9_agent.catalog_uiThen open http://127.0.0.1:8787.
5. Chat on the Mac. For the AI box itself:cd /Users/kiamalek/Agents/I9_Agent source .venv/bin/activate set -a && source .env && set +a adk web .That local ADK UI is not the WordPress Kia plugin. Same idea (a chat box), different program.
6. Host on Google Cloud, not WordPress. WordPress cannot run this Python server. A Cloud Run service (i9-catalog in project i9-agent) serves the page to the internet. Default Gemini Project is only for Gemini credits; it cannot host Cloud Run.
7. Show it on the website. i-9.ir keeps the shop. A WordPress page iframes the Cloud URL (see below). The Kia-style AI Engine plugin can stay a chat widget; it should link to this list, not try to draw the cards itself.
Publish, then add that page to the menu. Do not upload catalog.html into the theme. The iframe src must stay the Cloud URL so search and photos keep working.
Project map
Path
Role
i9_agent/agent.py
Gemini instructions and tools
i9_agent/tools.py
Product search + Telegram notify
i9_agent/i9_api.py
Catalog pages of 20 from API or JSON
i9_agent/catalog_ui.py
HTTP server for the list and thumbnails
i9_agent/static/catalog.html
The dark RTL product UI
Dockerfile + entrypoint.sh
What Cloud Run runs
https://kiaapp.xyz/wp-content/uploads/2025/09/favicon2-4-300x200.png00Kiahttps://kiaapp.xyz/wp-content/uploads/2025/09/favicon2-4-300x200.pngKia2026-08-16 15:10:132026-09-17 20:43:59How we made I-9 Agent on a Mac
The current Google ADK Python CLI command tree includes api_server, conformance, create, deploy, eval, eval_set, migrate, optimize, run, test, and web. Your installed version may differ, so verify it locally with adk --help. Official ADK CLI reference
1. Display ADK help
adk --help
Shows every top-level command available in your installed ADK version.
For help with a specific command:
adk COMMAND --help
Example:
adk web --help
2. Display the installed ADK version
adk --version
Confirms which ADK CLI version is active.
3. Create a new agent project
adk create APP_NAME
Example:
adk create my_agent
Creates a new directory containing a prepopulated agent template.
This exposes agents through REST endpoints for connection to a website, mobile application, backend, or test client. By default, it runs at http://localhost:8000. ADK API Server documentation
It supports most of the server options available to adk web, including:
--host
--port
--allow_origins
--log_level
--reload
--reload_agents
--a2a
--url_prefix
--trigger_sources
--session_service_uri
--artifact_service_uri
--memory_service_uri
--trace_to_cloud
--otel_to_cloud
Deployment commands
7. Display deployment options
adk deploy --help
ADK currently provides deployment subcommands for:
Migrates session data into the latest database schema.
Setup commands related to ADK
These are package-management commands, not ADK subcommands.
Install Google ADK
pip install google-adk
Upgrade Google ADK
pip install --upgrade google-adk
Inspect the installed package
pip show google-adk
Confirm the executable location
which adk
Stop any running ADK server
Ctrl+C
Complete command tree
adk
├── api_server
├── conformance
│   ├── record
│   └── test
├── create
├── deploy
│   ├── agent_engine
│   ├── cloud_run
│   └── gke
├── eval
├── eval_set
│   ├── add_eval_case
│   ├── create
│   └── generate_eval_cases
├── migrate
│   └── session
├── optimize
├── run
├── test
└── web
For everyday development, the five most important commands are:
adk create my_agent
adk run my_agent
adk web .
adk api_server .
adk deploy cloud_run --project=PROJECT_ID --region=REGION my_agent
https://kiaapp.xyz/wp-content/uploads/2025/09/favicon2-4-300x200.png00Kiahttps://kiaapp.xyz/wp-content/uploads/2025/09/favicon2-4-300x200.pngKia2026-07-13 18:04:482026-09-17 18:00:18Complete Command Guide for ADK Web Development and Google Cloud Deployment
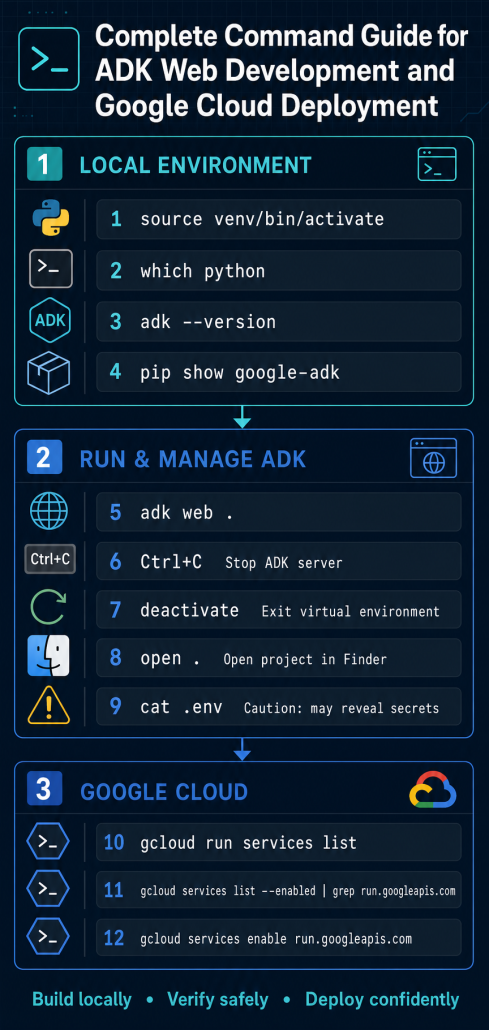
Description: Activates the project’s isolated Python environment, so Python and pip use project-specific packages.
Web-development usage: Prevents dependencies from differentPython web projects—such as Django, Flask, FastAPI, or ADK—from conflicting.
Confirm which Python installation is active:
which python
Description: Displays the filesystem path of the Python executable currently being used.
Web-development usage: Confirms that your terminal is using the project’s virtual-environment Python instead of the system Python.
Check the installed Google ADK version:
adk --version
Description: Prints the installed version of the Google Agent Development Kit command-line tool.
Web-development usage: Helps verify compatibility when developing an AI agent that will connect to a website or web application.
Display information about the installed ADK package:
pip show google-adk
Description: Shows the package version, installation location, dependencies, and other metadata.
Web-development usage: Useful for debugging missing packages, dependency conflicts, or differences between development and deployment environments.
Start the ADK web interface from the current project:
adk web .
Description: Starts ADK’s local development server and web interface using the project in the current directory.
Web-development usage: Lets you test and interact with an AI agent through a browser before connecting it to your production website.
Stop the running ADK server:
Ctrl+C
Description: Sends an interrupt signal to the active terminal process and stops the local server.
Web-development usage: Used to stop a development server before changing configuration, installing packages, or restarting the application.
Ctrl+C stops ADK, but it does not exit the virtual environment.
Exit the virtual environment:
deactivate
Description: Returns the terminal to the system’s default Python environment.
Web-development usage: Useful when you finish working on one Python web project and want to switch to another environment or project.
Open the current folder in macOS Finder:
open .
Description: Opens the terminal’s current directory in the macOS Finder application.
Web-development usage: Makes it convenient to inspect, move, or open project files with graphical applications and code editors.
Display the .env file:
cat .env
Description: Prints the contents of the project’s environment-variable file in the terminal.
Web-development usage: Helps inspect configuration values such as database addresses, API endpoints, secret keys, ports, and environment settings.
Be careful: .env may contain API keys and passwords. Never share its output, commit it to Git, or include it in screenshots.
A safer way to list only the variable names is:
sed 's/=.*$/=***HIDDEN***/' .env
List deployed Cloud Run services:
gcloud run services list
Description: Lists the Cloud Run services available in the active Google Cloud project.
Web-development usage: Helps locate deployed websites, APIs, backends, webhooks, and AI-agent services, along with their regions and URLs.
If necessary, specify the project and region:
gcloud run services list --project=YOUR_PROJECT_ID --region=YOUR_REGION
This is helpful when your local gcloud configuration points to a different project or default region.
Check whether the Cloud Run API is enabled:
gcloud services list --enabled | grep run.googleapis.com
Description: Lists enabled Google Cloud APIs and filters the results for the Cloud Run API.
Web-development usage: Cloud Run cannot deploy or manage a containerized web application until its required API is enabled.
If nothing is returned, enable it with:
gcloud services enable run.googleapis.com
This prepares the active Google Cloud project to deploy web applications, APIs, and agent services on Cloud Run.
https://kiaapp.xyz/wp-content/uploads/2025/09/favicon2-4-300x200.png00Kiahttps://kiaapp.xyz/wp-content/uploads/2025/09/favicon2-4-300x200.pngKia2026-07-13 15:50:522026-09-17 19:43:53Here is the command list with an additional explanation and its web-development usage: